Whether you're a new web developer or more experienced senior developer, testing is a key component of being able to make sure your web applications are bug-free and work as intended. Although at first you might only want to do manual testing (for example if you're quickly hacking something together), in more robust work pipelines where your application may have some paid users that depend on the service, testing can be a great tool to assist with automation and saving time (especially with regards to more complicated workflows).
This article will describe and compare how testing is done in JavaScript, and then follow with how to test in Rust. Jest will be primarily used for comparison. If you plan on following the Rust parts, you may wish to install Rust here.
Test Setup
In JavaScript, testing is typically something that you either do manually (by just opening the webpage and testing that the functionality you implemented works) or through a specific JavaScript testing framework - two of the most popular ones being Mocha and Jest, with Jest in particular originally being a tool created for testing React but being able to be run other frameworks, such as Express or whatever you need and Mocha being a more general testing framework for Node.js.
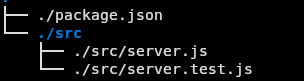
As you may know (or not!) already, you will generally need to put your tests in their own separate files for tests in JavaScript to run, then use mocha or jest depending on which library you're using - which then runs all of the tests. Best practice dictates that you put your test file next to wherever the actual file is (switching out the ".js" at the end for ".test.js"). Specific frameworks and libraries like React may also have their own testing facilities - for example, you can use React Testing Library if you want to test React. Your file/folder setup might look like this:
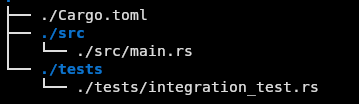
In comparison when it comes to using Rust, tests are an inbuilt part of the language tooling via Cargo, the language's build system and package manager. You don't need any external crates (libraries) - you just use cargo test and if there's any tests, it will run them. You can either place tests within the same files as your code, or you can create your own tests folder and run the tests from there. Either way, cargo test will recognise and run it. You can also specify whether the tests are unit tests or integration tests. A test folder for Rust might look like this:
Although the language tooling itself has good testing capabiliities, we can take this one step further by using packages like cargo-nextest, a test runner CLI for Rust projects that builds on top of the already-existing test capabilities to greatly improve the user experience when it comes to identifying slow and leaky tests (meaning tests which are either slow, or create things during the tests that are not cleaned up after), test speed improvements and Continuous Integration pipeline compatibility. You can get started with it by using the following:
cargo install cargo-nextest
When it's installed, you can use cargo nextest run and it will run all tests within a workspace. Interested? Find more about cargo-nextest here.
Although we will primarily be focusing on the Rust standard testing capabilities for ease of use, there are also quite a few helper libraries for testing; for example, test-case which helps you build up test cases for tests by providing macros that you can stack on top of a test function and lets_expect which provides a macro in the form of lets_expect!() to help you test faster and more ergonomically.
Some Rust crates may also have their own testing library, in addition to this. Backend web frameworks in particular have their own Rust testing crates that let you do things like calling specific handler functions by themselves, so that you don't have to mock the entire API - we'll discuss this later on in the article.
Unit Testing
With regards to unit testing, there is not a huge amount of difference between JavaScript and Rust. You import what files you need, and then run them.
For example, if you have a file called sum.js with the following JS unit test:
// sum.js
// This function we're testing adds two numbers together
function sum(a, b) {
  return a + b;
}
module.exports = sum;
Then you would create a file called sum.test.js, which contains our actual test:
// sum.test.js
const sum = require('./sum');

test('adds 1 + 2 to equal 3', () => {
  expect(sum(1, 2)).toBe(3);
});
As you can see, we've imported the function from our other file then added a simple test that expects the function with some given parameters to be equal to another given value.
Then once we're done with whatever tests we want to add, we then run jest and the test should pass.
Want to group tests together? You can do that pretty easily! Just use describe to create a group of tests, then insert the tests you want to make like so:
describe('matching cities to foods', () => {
  // Applies only to tests in this describe block
  beforeEach(() => {
    return initializeFoodDatabase();
  });

  test('Vienna <3 veal', () => {
    expect(isValidCityFoodPair('Vienna', 'Wiener Schnitzel')).toBe(true);
  });

  test('San Juan <3 plantains', () => {
    expect(isValidCityFoodPair('San Juan', 'Mofongo')).toBe(true);
  });
});
As mentioned before, you can group both your regular code and Rust unit testing together. Typically, this is used for things that are not declared as public, but if you don't want to put your tests in a tests folder, you can also add your tests this way. You can put your files and code together like this:
// lib.rs
// for reference: the "usize" type means any non-negative integer
pub fn add(left: usize, right: usize) -> usize {
// because Rust implicitly returns, no explicit "return" phrase is required
    left + right
}

// this is a required annotation to set up tests
#[cfg(test)]
mod tests {
// this means "import everything"
    use super::*;

    // this macro indicates this function is for a test
    #[test]
    fn it_works() {
        let result = add(1, 2);
        // assert_eq! is a macro we can use to ensure one value is exactly equal to another value
        assert_eq!(result, 3);
    }
}
In comparison to Jest, Rust doesn't have test grouping enabled by default in the standard library although you can enable similar tests for behaviour-driven development if you use rspec, which is a framework that supports this kind of testing. In terms of organising your integration tests, normally if you have a lot of different integration tests you can split them into separate files if you want to separate them by user behaviour, what part of a program it's testing or any other criteria. You can find more about this here.
Setup and Teardown
Sometimes, you might need to do some work before or after every test: with testing in JavaScript via Jest, this is very simple to do. You need to create functions that carry out what you need to do, then either attach them to a beforeEach or afterEach statement, depending on what you want to do.
In JS testing with Jest, this is quite simple:
async function initialiseCityDatabase {
  // ... your code for setting up the test database here
}

async function clearCityDatabase {
  // ... your code for resetting the test database here
}

// this runs before each test
beforeEach(() => {
  initializeCityDatabase();
});

// this runs after each test
afterEach(() => {
  clearCityDatabase();
});
In Rust, although there is no such thing provided by the default testing functionality, you can still run a setup and teardown function so that you can delete any artefacts created by the tests (for example, SQL records that may have been left over in the test database). Below is an example of what this might look like:
// the PgPool type is a Postgres connection pool type provided by SQLx, a Rust SQL crate
async fn setup_database() -> sqlx::PgPool {
  // ... your code to set the database up
}

async fn teardown_database(db: sqlx::PgPool) {
  // ... your code to reset the database
}

#[test]
async fn do_stuff() {
  let database = setup_database().await;

  // ... do some stuff and assertions

  teardown_database(database).await;
}
You can also use libraries like test-context to be able to write your setup and teardown, which makes it much easier as you can use a macro on top of a test function and you can also implement test contexts for multiple structs. A small snippet from the library's documentation follows below:
use test_context::{test_context, TestContext};

// declare a struct
struct MyContext {
    value: String
}

// implement the "TestContext" trait for said struct by implementing the functions the trait provides
impl TestContext for MyContext {
    fn setup() -> MyContext {
        MyContext {  value: "Hello, world!".to_string() }
    }

    fn teardown(self) {
        // Perform any teardown you wish.
    }
}

// add the test_context macro here
#[test_context(MyContext)]
#[test]
fn test_works(ctx: &mut MyContext) {
    assert_eq!(ctx.value, "Hello, world!");
}
Mocking
Don't worry, there will be no insults will be flying around here! Mocking is a practice commonly used with unit testing where you create a mock of an object (as much as is required) for the purpose of using it in a test. The goal of mocking is to isolate a unit of code away from things that would normally use or create said code. Testing in isolation helps to determine whether or not a certain function by itself is correct or not.
Do note for this section that "fakes" and "mocks" are not the same thing - fakes are functional versions of mocks that attempt to replicate the real thing that you want to use. You don't always need mocks, but you might need fakes!
With JavaScript testing, you can create a mock function to be used in test code, or you can write a manual mock that overrides a module dependency (although typically, you'll be doing more of the first one unless you have a specific reason as to why you need to override the module dependency).
// forEach.js
// this function takes an array and function,
// then applies the callback function to each item in the array
export function forEach(items, callback) {
  for (let index = 0; index < items.length; index++) {
    callback(items[index]);
  }
}

// forEach.test.js
const forEach = require('./forEach');

const mockCallback = jest.fn(x => 42 + x);

test('forEach mock function', () => {
  forEach([0, 1], mockCallback);

  // The mock function was called twice
  expect(mockCallback.mock.calls).toHaveLength(2);

  // The first argument of the first call to the function was 0
  expect(mockCallback.mock.calls[0][0]).toBe(0);

  // The first argument of the second call to the function was 1
  expect(mockCallback.mock.calls[1][0]).toBe(1);

  // The return value of the first call to the function was 42
  expect(mockCallback.mock.results[0].value).toBe(42);
});
As you can see above, by using mocking you can get extra information about a function for testing purposes - for example, how many times a function was called or how many times a mock was created.
Now let's talk about mocking modules. Jest is able to mock dependencies and modules for testing - but what does this mean in practice? Let's say you need to use a real API or have an API you're building that is supposed to have some data that your web app is supposed to call normally. You can mock a dependency like axios to be able to model fake data from the API and then test your code using the fake data mock! Let's have a look at what this would look like below:
// users.js
import axios from 'axios';

class Users {
  static all() {
    return axios.get('/users.json').then(resp => resp.data);
  }
}

export default Users;

// users.test.js
import axios from 'axios';
import Users from './users';

jest.mock('axios');

test('should fetch users', () => {
  const users = [{name: 'Bob'}];
  const resp = {data: users};
  axios.get.mockResolvedValue(resp);

  // or you could use the following depending on your use case:
  // axios.get.mockImplementation(() => Promise.resolve(resp))

  return Users.all().then(data => expect(data).toEqual(users));
});
This is not all of course - you can also mock a subset of a module (a "partial") and then have the rest of the module keep its regular implementation.
In Rust, mocking doesn't require any special libraries can be done quite easily through creating custom implementations of any traits you want in a test to get the same behaviour as mocking. Traits in Rust are groups of methods defined for a particular type, which you can implement for a struct or enum. You can read more about this here..
Additionally, there are also several libraries that aim to provide assistance with mocking but one of the most popular ones we'll be looking at is mockall. If you want to try mockall for yourself and have Rust installed, you'll want to spin up a new Rust project, navigate to the project folder and run the following:
cargo add mockall
Let's have a look at how you can create a mock that implements multiple traits:
use mockall::*;
use mockall::predicate::*;

trait MyTrait {
  fn foo(&self) -> u32;
  fn bar(&self, x: u32) -> u32;
}

trait MySecondTrait {
  fn baz(&self) -> u32;
  fn boo(&self, x: u32) -> u32;
}

// mock macro from mockall
mock! {
  pub MyStruct {}
 // implementing
  impl MyTrait for MyStruct {
    fn foo(&self) -> u32 { 1u32 }
    fn bar(&self, x: u32) -> u32 { x + 1 }
  }

  impl MySecondTrait for MyStruct {
  fn baz(&self) -> i32 { 1i32 }
  fn boo(&self, x: i32) -> i32 { x + 1 }
}
}

let mut mock = MockMyStruct::new();
As you can see above, we've now implemented two traits on a single struct that we can now use for any kind of testing we want to do!
That's not all however. We can also modify the behaviour of our mock object's behaviour, through using the methods on our mock variable to return a specific value:
let mut mock = MockMyStruct::new();

// for reference: the return value is 44, but adding u32 specifies that it should be a u32 type
mock.expect_foo()
    .return_const(44u32);
Now whenever we use mock.foo(), the answer will always return 44 and it will always return a type of u32 (unsigned 32-bit integer). This is great for us as it means we can mock any kind of dependency we want and can be used similarly to the example we used before for the axios mock where we mocked up some data and then created some tests around the provided data.
Integration Testing
Integration testing (otherwise known as end-to-end testing) is a more general kind of testing to test how functions integrate together by using them in the same test. Initially, you might do this manually (for example, testing out registering to a website and then logging in) but eventually at some point you're going to want to automate testing the overall functionality of your application, especially as you start getting more and more functions.
In JavaScript, how you'll approach this depends on what libraries you're using. Are you using React? You'll need Jest along with React Testing Library. Are you using Express? There's a number of ways you can do it - but for the purposes of this example, let's assume you already have an Express.js application that you want to test using Jest:
const express = require('express')
const app = express()
const port = 3000

app.get('/', (req, res) => {
  res.send('Hello World!')
})

app.listen(port, () => {
  console.log(`Example app listening on port ${port}`)
})
You would ideally want to install supertest to make it easier to test, by using npm i --save-dev supertest. Your package.json file would want to have this added in:
"scripts": {
    // ... your other scripts
    "test": "jest",
    // ... your other scripts
},
"jest": {
    "testEnvironment": "node",
    "coveragePathIgnorePatterns": [
       "/node_modules/"
    ]
},
Then you serve a single test (or however many you want) from your test file:
// server.test.js
const request = require('supertest')
const app = require('../server')

describe('Testing routes', () => {
  it('should return Hello World', async () => {
    const res = await request(app)
      .get('/')
      .send()

    expect(res.statusCode).toEqual(200)
  })
})
As you can see, using supertest with jest boosts its capabilities considerably by allowing it to expect things from the response - for example, the status code or what the body contains. This makes it much, much easier to test your backend and makes the testing experience much better.
With regards to Rust integration tests, although there's no default helper library you can still write integration tests by just writing tests that utilise many parts or functions from your program together. For example, you might have some code to setup an SQL database instance, then an integration test that adds and manipulates some data that's contained in your database and finally the teardown code to reset your test database.
// tests/common/mod.rs
pub fn setup() {
    // some setup code, like creating required files/directories, starting
    // servers, etc.
}
// tests/integration_test.rs
// importing common module.
mod common;

#[test]
fn test_add() {
    // using common code.
    common::setup();
    assert_eq!(adder::add(3, 2), 5);
}
Although how you test a server generally depends on what web framework you're using, some web frameworks are built from the ground up to be made easier to test. For example, in axum which has extremely strong compatibility with tower (a set of utilities for robust networking clients), you can simply just initialise your axum::Router then send a oneshot request to it. We can see an example of this below.
Let's say we have a main.rs file, which has a basic Axum router (see codeblock comments for explanations):
// main.rs
// import functions from dependencies to bring them into scope
use axum::Router;
use axum::routing::get;
use axum::http::{Request, StatusCode};
use std::net::SocketAddr;

// a handler function that simply returns "Hello world!"
async fn hello_world() -> &'static str {
    "Hello world!"
}

// this function returns a Router type that uses the hello_world handler with GET method
fn init_router() -> Router {
    Router::new().route("/users", get(hello_world))
}

#[tokio::main]
async fn main() {
let router = init_router();

// parse the socket address from a tuple that contains an IPv4 array plus port
let addr = SocketAddr::from(([0,0,0,0], 8000));

// serve the router at the socket address
axum::Server::bind(&addr).serve(router.into_make_service()).await.unwrap();
}
We could then set up the tests like this - in this case we could probably just set it up in the same file as the main.rs file:
#[cfg(test)]
mod tests {
    use super::*;

    // we use the Tokio test macro here - using the regular one will not work
    // as this test requires async functionality to work
    // you will need the "macros" feature enabled for Tokio to use this
    #[tokio::test]
    async fn it_works() {
        let app = init_router();

        let response = app
            // send a request to the root endpoint with an empty body
            .oneshot(Request::builder().uri("/").body(Body::empty()).unwrap())
            .await
            .unwrap();

        // assert the response has 200 OK status
        assert_eq!(response.status(), StatusCode::OK);

        let body = hyper::body::to_bytes(response.into_body()).await.unwrap();

        // assert the response body
        assert_eq!(&body[..], b"Hello, World!");
    }
}
You can also assert things like cookies, iterating through cookies, headers, checking the response status and so on and so forth. You can also choose to save or not save cookies, clearing headers - everything you need to be able to reliably test your web service. You can check out more about the TestResponse methods here.
We also can carry out black-box API testing if our program or web application is reliant on usage of an external API and you don't want to trigger API calls. Wiremock, a crate originally created by Luca Palmieri who wrote Zero to Production in Rust, is a great way to do this. It's quite simple to use and works by creating a lightweight HTTP server that you can then use for any kind of testing that you want to use; for example, you can mock an API that returns some data, then use that data in a real function that you want to test.
Let's see how this works. We will start a MockServer, mount a route to it then use surf (a HTTP request library) to send a HTTP request to our mock server, which we will then use assert_eq! on to make sure that the status code is 200 OK. See the example below:
// main.rs
// import items for use, bringing them into scope
use wiremock::{MockServer, Mock, ResponseTemplate};
use wiremock::matchers::{method, path};

// the tokio main macro is what allows async main functions in Rust
// see the Tokio library documentation for more information
#[tokio::main]
async fn main() {
    // Start a background HTTP server on a random local port
    let mock_server = MockServer::start().await;

    // Arrange the behaviour of the MockServer adding a Mock:
    // when it receives a GET request on '/hello' it will respond with a 200.
    Mock::given(method("GET"))
        .and(path("/hello"))
        .respond_with(ResponseTemplate::new(200))
        // Mounting the mock on the mock server - it's now effective!
        .mount(&mock_server)
        .await;

    // If we probe the MockServer using any HTTP client it behaves as expected.
    let status = surf::get(format!("{}/hello", &mock_server.uri()))
        .await
        // "unwrap" means get the value or abort and terminate the process
        .unwrap()
        .status();
    assert_eq!(status.as_u16(), 200);

    // If the request doesn't match any `Mock` mounted on our `MockServer` a 404 is returned.
    let status = surf::get(format!("{}/missing", &mock_server.uri()))
        .await
        .unwrap()
        .status();
    assert_eq!(status.as_u16(), 404);
}
As you can see, this is pretty easy!
Finishing Up
Thanks for reading this article! I hope you have gained a better understanding of testing in Rust vs JS and maybe a little bit of knowledge about setting up a basic web router in Rust using Axum.
Looking for more info? Check out some of our other articles:
- Check out our docs page for the fundamentals on writing an Axum web service here.
- New to Rust? Check out Shuttle Launchpad, our free newsletter for learning Rust!
If this article helped you, feel free to give us a star on GitHub!